MindCV


Introduction |
Installation |
Get Started |
Tutorials |
Model List |
Notes
Introduction
MindCV is an open source toolbox for computer vision research and development based on MindSpore. It collects a series of classic and SoTA vision models, such as ResNet and SwinTransformer, along with their pretrained weights. SoTA methods such as AutoAugment are also provided for performance improvement. With the decoupled module design, it is easy to apply or adapt MindCV to your own CV tasks.
Major Features
- Easy-to-Use. MindCV decomposes the vision framework into various configurable components. It is easy to customize your data pipeline, models, and learning pipeline with MindCV:
>>> import mindcv
# create a dataset
>>> dataset = mindcv.create_dataset('cifar10', download=True)
# create a model
>>> network = mindcv.create_model('resnet50', pretrained=True)
Users can customize and launch their transfer learning or training task in one command line.
# transfer learning in one command line
>>> !python train.py --model=swin_tiny --pretrained --opt=adamw --lr=0.001 --data_dir={data_dir}
-
State-of-The-Art. MindCV provides various CNN-based and Transformer-based vision models including SwinTransformer. Their pretrained weights and performance reports are provided to help users select and reuse the right model:
-
Flexibility and efficiency. MindCV is bulit on MindSpore which is an efficent DL framework that can run on different hardward platforms (GPU/CPU/Ascend). It supports both graph mode for high efficiency and pynative mode for flexibity.
Benchmark Results
Coming soon.
Installation
Dependency
- mindspore >= 1.8.1
- numpy >= 1.17.0
- pyyaml >= 5.3
- tqdm
- openmpi 4.0.3 (for distributed mode)
To install the dependency, please run
pip install -r requirements.txt
MindSpore can be easily installed by following the official instruction where you can select your hardware platform for the best fit. To run in distributed mode, openmpi is required to install.
The following instructions assume the desired dependency is fulfilled.
Install with pip
MindCV can be installed with pip.
pip install https://github.com/mindlab-ai/mindcv/releases/download/v0.0.1-beta/mindcv-0.0.1b0-py3-none-any.whl
Install from source
To install MindCV from source, please run,
pip install git+https://github.com/mindlab-ai/mindcv.git
Get Started
Hands-on Tutorial
To get started with MindCV, please see the transfer learning tutorial, which will give a quick tour on each key component and the train/validate/predict pipelines in MindCV.
Below is a few code snippets for your taste.
>>> import mindcv
# List and find a pretrained vision model
>>> mindcv.list_models("swin*", pretrained=True)
['swin_tiny']
# Create the model object
>>> network = mindcv.create_model('swin_tiny', pretrained=True)
# Validate its accuracy
>>> !python validate.py --model=swin_tiny --pretrained --dataset=imagenet --val_split=validation
{'Top_1_Accuracy': 0.808343989769821, 'Top_5_Accuracy': 0.9527253836317136, 'loss': 0.8474242982580839}
Image classification demo
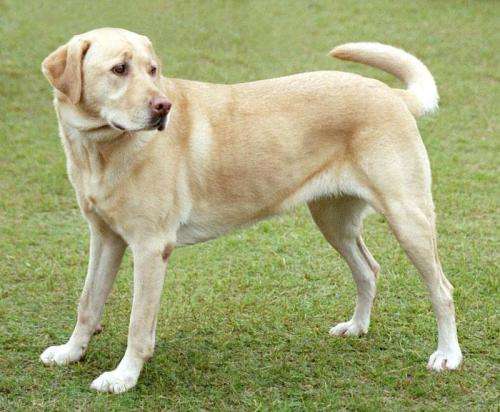
Infer the input image with a pretrained SoTA model,
>>> !python infer.py --model=swin_tiny --image_path='./tutorials/dog.jpg'
{'Labrador retriever': 0.5700152, 'golden retriever': 0.034551315, 'kelpie': 0.010108651, 'Chesapeake Bay retriever': 0.008229004, 'Walker hound, Walker foxhound': 0.007791956}
The top-1 prediction result is labrador retriever (拉布拉多犬), which is the breed of this cut dog.
Useful Script Guidelines
It is easy to train your model on standard datasets or your own dataset with MindCV. Model training, transfer learning, or evaluaiton can be done using one or a few line of code with flexible configuration.
It is easy to do model training with train.py. Here is an example for training a DenseNet on CIFAR10 dataset using one computing device (i.e., standalone GPU).
python train.py --model=resnet50 --dataset=cifar10 --dataset_download
For more parameter description, please run `python train.py --help'. You can define change model, optimizer, and other hyper-parameters easily.
Validation while training. To track the validation accuracy change during traing, please enable --val_while_train, for example
python train.py --model=resnet50 --dataset=cifar10 \
		--val_while_train --val_split=test --val_interval=1
The training loss and validation accuracy for each epoch will be saved in {ckpt_save_dir}/results.log.
For large datasets like ImageNet, it is necessary to do training in distributed mode on multiple devices, which is well supported in MindCV. The following script is an example for training DenseNet121 on ImageNet with 4 GPUs.
export CUDA_VISIBLE_DEVICES=0,1,2,3  # suppose there are 4 GPUs
mpirun --allow-run-as-root -n 4 python train.py --distribute \
	--model=densenet121 --dataset=imagenet --data_dir=./datasets/imagenet
You can configure your model and other components either by specifying external parameters or by using a yaml config file. Here is an example for training using a preset yaml file.
mpirun --allow-run-as-root -n 4 python train.py -c configs/squeezenet/squeezenet_1.0_gpu.yaml
More yaml config files used to yield competitive results on ImageNet training can be found in the configs folder.
It is easy to validate a trained model with validate.py.
# validate a trained checkpoint
python validate.py --model=resnet50 --dataset=imagenet --val_split=validation --ckpt_path='./ckpt/densenet121-best.ckpt'
- Pynative mode with ms_function (Advanced)
By default, the training pipeline (train.py) is run in graph mode, which is optimized for efficienty and speed but may not be flexible enough for debugging. You may alter the parameter --mode to switch to pure pynative mode for debugging purpose.
Pynative mode with ms_function is a mixed mode for comprising flexibity and efficiency in MindSpore. To switch to pynative mode with ms_function, please use train_with_func.py instead, for example:
python train_with_func.py --model=resnet50 --dataset=cifar10 --dataset_download --epoch_size=10
For more examples, see examples/scripts.
Tutorials
We provide jupyter notebook tutorials for
Model List
Currently, MindCV supports the model families listed below. More models with pretrained weights are under development and will be released soon.
Supported models
Please see configs for the details about model performance and pretrained weights.
Notes
What is New
- Both BCE and CE loss now support class-weight config, label smoothing, and auxilary logit input (for networks like inception).
- Add Adan optimizer (experimental)
How to Contribute
We appreciate all contributions including issues and PRs to make MindCV better.
Please refer to CONTRIBUTING.md for the contributing guideline.
License
This project is released under the Apache License 2.0.
Acknowledgement
MindCV is an open source project that welcome any contribution and feedback. We wish that the toolbox and benchmark could serve the growing research community by providing a flexible as well as standardized toolkit to reimplement existing methods and develop their own new computer vision methods.
Citation
If you find this project useful in your research, please consider citing:
@misc{MindSpore Computer Vision 2022,
    title={{MindSpore Computer  Vision}:MindSpore Computer Vision Toolbox and Benchmark},
    author={MindSpore Vision Contributors},
    howpublished = {\url{https://github.com/mindlab-ecosystem/mindcv/}},
    year={2022}
}